How to setup cPanel on Amazon EC2 with Centos 6.4

I had a lot of problems setting up a cPanel server on Amazon EC2.

On my first attempt I used a CentOS image from the [AWS marketplace](https://aws.amazon.com/marketplace/seller-profile/) but using one of these images has a very bad side effect of not being able to resize, clone, and/or mount the root file system to another instance ( think about the issues with data recovery or fixing an un-bootable ec2 instance – yuck ) – this is what dgFactor [is referring to in his comment](https://aws.amazon.com/marketplace/review/product-reviews/ref=dtl_pop_customer_reviews)

My next attempt I had launched the instance but after it was launched cPanel would not install, giving errors similar to:

[20130131.123334] Setting up Install Process
[20130131.123334] No package wget available.
[20130131.123335] Nothing to do
[20130131.123339] E Sysup: Needed system RPMs were not installed: wget
[20130131.123339] ***** FATAL: Cannot proceed. Needed system RPMs were not installed.
[20130131.123339] The Administrator will be notified to review this output when this script completes
[20130131.123339] E Detected events which require user notification during updatenow. Will send iContact the log
=> Log closed Thu Jan 31 12:33:39 2013
[20130131.123339] E Running `/usr/local/cpanel/scripts/updatenow –upcp –log=/var/cpanel/updatelogs/update.1359657200.log` failed, exited with code 4608
=> Log closed Thu Jan 31 12:33:39 2013

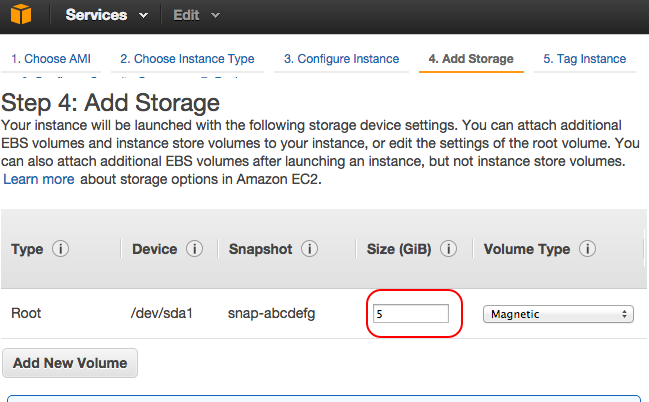
What seems to have happened here is that the file system was full. Even though I had increased the default drive size from 5GB to 40GB when the system booted the additional space was unavailable:

How to setup cPanel on Amazon EC2 with Centos 6.4

This can be confirmed from SSH after connecting to the instance:

[root@ip-101-11-2-133 ~]# df -h
Filesystem Size Used Avail Use% Mounted on
/dev/xvda1 5.0G 1.3G 3.4G 28% /
tmpfs 1.9G 0 1.9G 0% /dev/shm
[root@ip-172-30-0-165 ~]# fdisk -l

Disk /dev/xvda: 42.9 GB, 42949672960 bytes
255 heads, 63 sectors/track, 5221 cylinders
Units = cylinders of 16065 * 512 = 8225280 bytes
Sector size (logical/physical): 512 bytes / 512 bytes
I/O size (minimum/optimal): 512 bytes / 512 bytes
Disk identifier: 0xeabcdefg

Device Boot Start End Blocks Id System
/dev/xvda1 1 652 5237158+ 83 Linux
[root@ip-101-11-2-133 ~]#

### Steps to setup cPanel on Amazon EC2 with Centos 6.4

1. Pick a amazon machine image (ami) image from [bashton’s blog](http://www.bashton.com/blog/2013/centos-6-4-ami-available/) – I used a HVM version as they allow selecting any flavor of instance and all of the ‘current generation’ instances
1. After booting the instance, shut it down and then follow the steps from [Wilman Arambillete’s answer](http://stackoverflow.com/a/11318985/288032) with particular attention to the comment by Garreth McDaid regarding `resize2fs`

After completing these steps and switching your attached volumes so that the resized one is your primary (and only) drive mounted at `/dev/sda1` things should be working well.

One thing I found odd was that CentOS seemed to boot to the secondary attached drive `/dev/xvdf` – but I’m not positive if it was actually booting to this drive or just showing as if it was the primary (root) drive. Nonetheless, the steps from Garreth seemed to get things working.

###cPanel / WHM software installer

Now, to start the actual cPanel / WHM software installer script

sudo yum install screen wget -y

Once screen is installed, start a new session typing:

screen

That last step is important because if you don’t have screen running and your SSH session disconnects the installer may exit before cPanel setup has completed – and sometimes setup can take a few hours.

Use this this command to download the installer for cPanel with WHM:

wget -N http://httpupdate.cPanel.net/latest

Use this command to download the installer for DNS only version of cPanel:

wget -N http://httpupdate.cPanel.net/latest-dnsonly

After that script downloads, start

sh latest

You can find tips on how to use screen elsewhere so I won’t go into detail here, but to detach screen type: `Ctrl-a-d` which is done by holding `Ctrl` and pressing `a` then pressing `d` then releasing `Ctrl`

To reattach to your screen you can use the command:

screen -r

If you like screen you can also check out `tmux` but it is harder to get installed on CentOS 6 ( not installable with `yum` by default )

Posted in Linux, Server Administration | Tagged , | Leave a comment

Exclude fstab entries that use BIND from nagios nrpe check_disk / check_all_disks

Say you have an `/etc/fstab` file with an entry for `bind`:

tmpfs /dev/shm tmpfs defaults 0 0
devpts /dev/pts devpts gid=5,mode=620 0 0
sysfs /sys sysfs defaults 0 0
proc /proc proc defaults 0 0
** /root/special/folder /home/user1/folder none bind 0 0

If you run the `nagios` `nrpe` command (below) as `root` everything works fine:

/usr/lib64/nagios/plugins/check_disk -w 8% -c 5% -A -x /dev/shm -X nfs -X bind -i /boot

However, when you run this as the `nagios` user it fails (as is expected since the `nagios` does not have access to this folder):

sudo -u nagios /usr/lib64/nagios/plugins/check_disk -w 8% -c 5% -A -x /dev/shm -X nfs -X bind -i /boot
DISK CRITICAL – /home/user1/folder is not accessible: Permission denied

Since the `nrpe` checks are done with `nagios` a solution is needed. You could exclude the path specifically, using the `-x` flag:

`-x /home/user1/folder`

But you’d have to do that each time you make any changes to the `/etc/fstab` file.

In the commands above I left in the `-X bind` flag, which I attempted, although it does not work. I also tried `-X bindfs` with no luck.

There are some other flags for different types of file systems.

-X tmpfs
-X devpts
-X sysfs
-X proc
-X binfmt_misc
-X rpc_pipefs
-X nfs

These can also be written as:

–exclude-type=tmpfs
–exclude-type=devpts
–exclude-type=sysfs
–exclude-type=proc
–exclude-type=binfmt_misc
–exclude-type=rpc_pipefs
–exclude-type=nfs

However, the one that is needed to exclude the `bind` is actually the `none` file system, or `-X none` or `–exclude-type=none`

Posted in Server Administration | Tagged , , | Leave a comment

How to update bash on Ubuntu 10.10 Maverick – fix shellshock

Ubuntu `10.10 Maverick` is now past the end-of-life / end-of-support phase so it will no longer be getting any updates, including security updates. To update / patch `bash` you must do so from source. Here are the commands to download the source for bash and build and install it.

### Update – the instructions below were previous instructions, but to prevent the continuous need to apply patches there is an updated method using git:

## New Method 1

This method downloads a tarball of the latest source code and is around 7MB in size.

wget “http://git.savannah.gnu.org/cgit/bash.git/snapshot/bash-master.tar.gz”
unzip bash-master.tar.gz
cd bash-master
./configure
make
make install
## New Method 2

This method uses `git` and requires ~ 150MB of space ( includes version history ) but makes future updates easier with a `git pull`:

git clone git://git.sv.gnu.org/bash.git
cd bash
./configure
make
make install

## Old Method

mkdir src
cd src
wget http://ftp.gnu.org/gnu/bash/bash-4.3.tar.gz
#download all patches
for i in $(seq -f “%03g” 0 27); do wget http://ftp.gnu.org/gnu/bash/bash-4.3-patches/bash43-$i; done
tar zxvf bash-4.3.tar.gz
cd bash-4.3
#apply all patches
for i in $(seq -f “%03g” 0 27);do patch -p0 < ../bash43-$i; done #build and install ./configure && make && make install cd .. cd .. rm -r src ### Testing Bash for Shellshock Paste this into a terminal env x='() { :;}; echo vulnerable' bash -c "echo this is a test" **Desired Result** bash: warning: x: ignoring function definition attempt bash: error importing function definition for `x' this is a test If you get something like the above message you're good Old method source: [Hacker News](https://news.ycombinator.com/item?id=8364385) List of support dates for Ubuntu ( from wikipedia's Ubuntu page ): How to update bash on Ubuntu 10.10 Maverick – fix shellshock

Posted in Server Administration | Tagged , | 5 Comments

Chrome Developer Tools now Open on Right opposed to Opening on the Bottom

If you’ve downloaded a recent beta or canary build of Google Chrome you may notice that sometimes the “developer tools” seem to open at the right instead of at the bottom. If you’re not using a large, wide-screen monitor you may find this inconvenient. Unfortunately it seem the Chromium Developer’s personal preferences have to come before user-experience.

If you want the default setting for the position of Chrome’s Developer tools to be customizable, you’re out of luck. It will attempt to use your last-used preference, but you’ll notice that with incognito mode it will always end up being on the right. Because it is more convenient for the developers, and easier for them to change a default value string rather than code in an actual preference.

Wouldn’t it be nice to do this:

Chrome Developer Tools now Open on Right opposed to Opening on the Bottom

Unfortunately, that is not currently available. So what should you do? [Star it, and complain about it here.](https://code.google.com/p/chromium/issues/detail?id=408242)

Posted in Tech Tips, Web Development | Tagged | Leave a comment

Stay.app’s “Restore All Windows” command from Applescript

If you want to use applescript to run `cordlessdog.com`’s `Stay.app` command “Restore All Windows” command from Applescript, here is how to do it:

tell application “Stay”
set resultBoolean to restore all windows
end tell

Stay.app’s “Restore All Windows” command from Applescript

Stay.app supports 5 applescript commands which are:

– restore active application windows
– restore all windows
– store active application windows
– store active window
– store all windows

Posted in Mac, Tech Tips | Leave a comment

Ruby’s RVM, Shebang, dotfiles, and cron

When attempting to run cron files, and files remotely via SSH there were some issues. My default shell is `zsh` and the `rvm` setup is pretty standard too. ( Assuming that you already have rvm installed )

From the documentation [page](http://zsh.sourceforge.net/Intro/intro_3.html) there is this note:

> There are five startup files that zsh will read commands from:

$ZDOTDIR/.zshenv
$ZDOTDIR/.zprofile
$ZDOTDIR/.zshrc
$ZDOTDIR/.zlogin
$ZDOTDIR/.zlogout

> If ZDOTDIR is not set, then the value of HOME is used; this is the usual case.

In the `/etc/zsh/zprofile` file there was a line that did this:

test -f /etc/profile.d/rvm.sh && source /etc/profile.d/rvm.sh

I commented that line out, which is loaded for interactive shells, and moved it instead to `/etc/zsh/zshenv` which is loaded for both interactive and non-interactive shells.

This allows us to add the shebang `#!/usr/bin/env ruby` to the top of my `.rb` files, do a `chmod +x` and then run them directly ( eg: `$ ./my-script.rb` )

I don’t know if that is the most “proper” way of getting my scripts to work but it seems to work well for me.

For cron jobs ( in the file edited by `crontab -e` ) you may want to add something like this as your first line:

SHELL=”/usr/bin/zsh”

That would basically change the default shell for cron jobs. Again, your milage may vary and this probably won’t work on shared hosting platforms.

You can also check your setup to make sure that rvm is installed correctly by typing `rvm info` – if it gives you any errors search for solutions and fix them. If that command is not found then you probably need to install rvm again ( or perhaps try logging out and logging in again )

Posted in Uncategorized | Leave a comment

Chrome Breaks Custom Search Engines – version 37.0.2062.94

Google Chrome version 37.0.2062.94 breaks custom search engines. Yep, that’s right. If you had added custom search engines ( and custom shortcuts ) in your Chrome preferences they will not work in incognito mode with this version of Chrome, at least on Mac OS X. This has been an issue even with this version of chrome was in BETA mode, but now it is also affecting the “stable” version.

It may be worth it to downgrade to an older version of Chrome. If you do this you may get the message about “Your profile is from a newer version of Google Chrome” but that can easily be remedied. ( just search for the message )

Posted in Mac | Leave a comment

Install mitmproxy from source on Ubuntu

If you want to live on the dangerous side, you can install mitmproxy from its master branch. If you encounter any bugs, please do us the favor and report them on the Github issue tracker briefly.

### Install from source using PIP

pip uninstall mitmproxy netlib
pip install git+https://github.com/mitmproxy/netlib.git@master
pip install git+https://github.com/mitmproxy/mitmproxy.git@master

###Install from source on Ubuntu

Installing mitmproxy master from sources on stock Ubuntu – first uninstall using:

pip uninstall mitmproxy netlib

Now install the required tools:

$ sudo apt-get install -y build-essential libssl-dev libffi-dev python-dev python-pip libxml2-dev libxslt-dev git

Now install with sudo:

$ sudo pip install git+https://github.com/mitmproxy/netlib.git@master
$ sudo pip install git+https://github.com/mitmproxy/mitmproxy.git@master

Now start up a python console and paste in these two commands – this is a workaround for [issue 32](https://github.com/mitmproxy/netlib/issues/32) :

$ sudo python #
>>> from netlib import certffi
>>> exit()

Source: [github gist](https://gist.github.com/mhils/9315651)

Posted in Linux | Tagged , , | 1 Comment

Install syslinux 3.86 on Ubuntu

Get the syslinux 3.86 download [from here](https://www.kernel.org/pub/linux/utils/boot/syslinux/3.xx/), maybe the `syslinux-3.86.tar.gz` file

To build syslinux-3.86 on Ubuntu, Debian, and similar:

apt-get install build-essential nasm
cd /tmp
wget “https://www.kernel.org/pub/linux/utils/boot/syslinux/3.xx/syslinux-3.86.tar.gz”
tar -xf syslinux-3.86.tar.gz
cd /tmp/syslinux-3.86
make

you will most likely get some errors about building for windows, but when this process finishes you will have the 3.86 version of syslinux working.

Execute the main program by running:

/tmp/syslinux-3.86/linux/syslinux

You can also do a `make install` but that may conflict with other versions of syslinux you have installed ( if you have already tried `apt-get install syslinux`, for example)

Another note, you can run `apt-get install syslinux-legacy` to get a version of `syslinux` that is around `3.63` to `3.82`:

Check all of the versions by doing something like this:

$ which syslinux

/usr/bin/syslinux

$ strings /usr/bin/syslinux | grep SYSLINUX

SYSLINUX
SYSLINUX 4.05
SYSLINUX 4.05 20140113

$ which syslinux-legacy

/usr/bin/syslinux-legacy

$ strings /usr/bin/syslinux-legacy | grep SYSLINUX

SYSLINUX
SYSLINUX 3.63 Debian-2012-04-16

$ strings /tmp/syslinux-3.86/linux/syslinux | grep SYSLINUX

SYSLINUX
SYSLINUX 3.86 0x53e5a115

Posted in Server Admin | Leave a comment

ThinkCentre M83 (10AK) Linux Network Driver

The IBM ThinkCentre M83 ( types `10AG`, `10AK`, `10AL`, and `10BE`) have the Intel I217 / L217LM Clarkville according to their [spec sheet](http://support.lenovo.com/en_US/detail.page?DocID=PD028161)

Their driver download page [does not](http://support.lenovo.com/es_MX/downloads/detail.page?DocID=DS033624) have a linux network driver.

However, the [Intel Download Center](https://downloadcenter.intel.com/Detail_Desc.aspx?DwnldID=15817) provides a driver that should work for these machines.

Posted in Uncategorized | Leave a comment