How can I recover a crashed Rackspace Cloud Server?

I’m now starting to use Rackspace after a having a lot of experience with Amazon AWS and so I’m having a hard time understanding a few things about the way Rackspace works. One of these things is “Disaster Recovery” for a Rackspace “Cloud Server’s” primary drive primary drive.

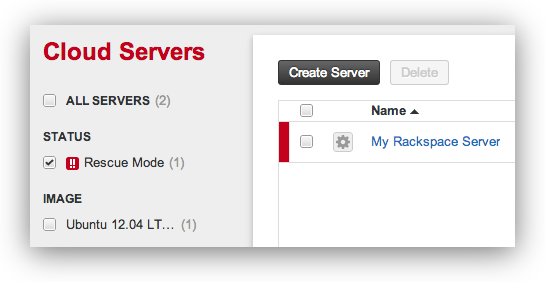
There is a lot of server terminology with Rackspace so for clarification I’m talking about the ones in the [Cloud Servers control panel](http://mycloud.rackspace/) that are in this tab:

How can I recover a crrashed Rackspace Cloud Server?

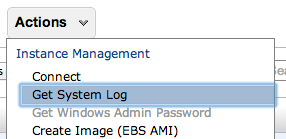
So my point of confusion is this: If I screw up something big on AWS, like the `/etc/fstab` file and the server won’t boot, I can use the AWS control panel to get the console log:

How can I recover a crrashed Rackspace Cloud Server?

If I need to edit things on the primary drive I can “detatch” it from the instance and attach it to another server, and then access the files on it.

I searched the Rackspace knowledge base and also read the [Disaster Recovery blog post](http://www.rackspace.com/blog/disaster-recovery-in-the-cloud/) which mentions three ways of doing disaster recovery with Rackspace:

1. Take regular snapshots and restore the instance from one of those
1. Do manual file system and database backups to have a copy of your data NOT on the primary drive
1. Replication with Manual Failover (seems like overkill)

I also saw that it is possible to boot the server into “recovery mode” but I haven’t tried it yet.

The way I’m planning on running my rackspace server is attaching another drive (aka Storage Volume) and putting all the application data on that. I am also planning on doing regular “saved images” of the server. **But if the server won’t boot up and won’t start in safe-mode, is there no way to accesset the data stored on the primary drive?**

Best Answer I Could Find was from [server fault](http://serverfault.com/questions/406582/what-are-my-options-with-a-downloaded-rackspace-cloud-image) and it said to:

1. Download the emergency recovery files which are tar.gz files in 5GB chunks
2. `cat` them together into a single `.tar.gz` file.
3. `tar -xf` to extract the file (requires approximately 2x the size of the image of free space – 20GB drive needs 40-50GB of free space to uncompress)
4. get your files from this unzipped folder.

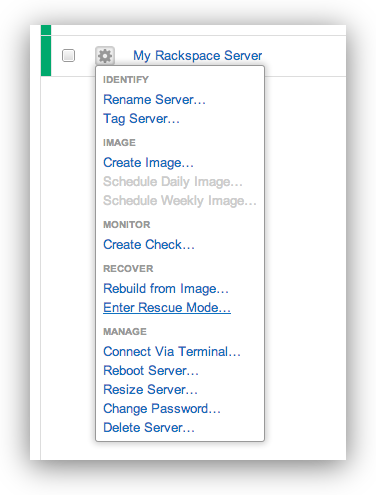
When I tried to figure this out for myself I found something a bit different – one of the options for the server is “Enter Rescue Mode…” which you can do via the control panel:

###Right Click the Server and Choose Enter Rescue Mode

How can I recover a crashed Rackspace Cloud Server?

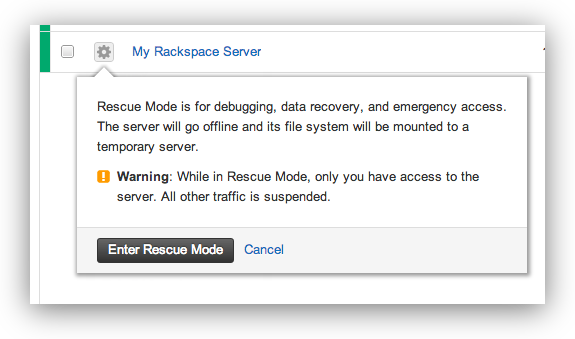
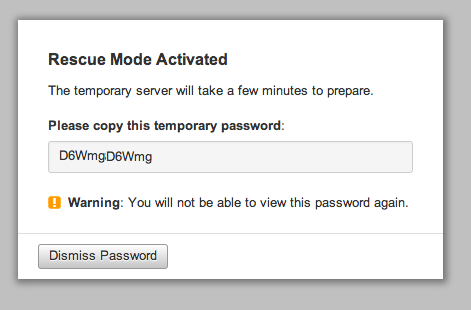
###A Dialog Box Will Warn You About Rackspace’s Rescue Mode

> Rescue Mode is for debugging, data recovery, and emergency access. The server will go offline and its file system will be mounted to a temporary server. Warning: While in Rescue Mode, only you have access to the server. All other traffic is suspended.

How can I recover a crashed Rackspace Cloud Server?

###You’ll get a Temporary Password for The Rescue Mode Server

How can I recover a crashed Rackspace Cloud Server?

###The Rackspacer Server Control Panel will then show you it is in Emergency Mode

How can I recover a crashed Rackspace Cloud Server?

Now you can recover data, fix items, and hopefully restore your server.

Helpful linux commands for this:

See attached devices and info:

fdisk -l

Mount your old drive so you can access it (commands for Ubuntu 12)

mkdir /vol
mount /dev/xvdb1 /vol

Edit and adjust commands based on your system.

Posted in Server Admin | Tagged , , , | Leave a comment

What is ming for PHP (php5-ming) ?

What is ming for PHP (php5-ming) ?Reading a recent server setup guide I saw the suggestion to use `apt-get install php5-ming` to install Ming – as a (suggested) module that WordPress would like to have.

so what is MING ?

First of all: Ming is not an acronym. Ming is an open-source (LGPL) library which allows you to create SWF (“Flash”) format movies. Ming supports almost all of Flash 4’s features, including: shapes, gradients, bitmaps (pngs and jpegs), morphs (“shape tweens”), text, buttons, actions, sprites (“movie clips”), streaming mp3, and color transforms –the only thing that’s missing is sound events.

Note that all values specifying length, distance, size, etc. are in “twips”, twenty units per pixel. That’s pretty much arbitrary, though, since the player scales the movie to whatever pixel size is specified in the embed/object tag, or the entire frame if not embedded.

More information about ming is available in the [PHP documentation](http://php.net/manual/en/intro.ming.php)

Posted in Web Development | Tagged , | Leave a comment

Install Slanger on Ubuntu 12

Install Slanger on Ubuntu 12[Slanger](https://github.com/stevegraham/slanger) is an open source server implementation of the [Pusher](http://pusher.com/) protocol written in Ruby.

I wanted to install it on Ubuntu 12 but hit a few snags, so here’s how I got it working.

First, it seems pretty imperative that you have a good ruby version manager (rvm) tool available. On Mac OS X I use rbenv but on Ubuntu I think the best one is the one from `https://get.rvm.io` and not the one from `apt-get`.

So if you have installed the one from `apt-get` then it is probably best to remove it. Disclaimer – back up important files, blah bla blah, you should have some knowledge of linux, bla bla bla, I don’t know what you might accidentally delete while doing this. Be careful.

To remove the old rvm:

sudo apt-get –purge remove ruby-rvm
sudo rm -rf /usr/share/ruby-rvm /etc/rvmrc /etc/profile.d/rvm.sh

Then logout of the shell and/or reboot and run:

env | grep rvm

It should be blank, but if not try and find where the settings are coming from. I changed to the `/etc/` directory and ran `grep -Hil rvm` and found that it was in the `bash.profile` there so i removed the environmental variables being set there, then logged out of my shell and logged in again.

Once that is removed, you need to install the new version of `rvm` and from the website `get.rvm.io` the instructions say run this:

\curl -L https://get.rvm.io |
bash -s stable –ruby –autolibs=enable –auto-dotfiles

That worked great, I think it installed ruby 2.0 by default and I think it would be better to have 1.9.3 so I ran:

rvm install 1.9.3

After that completed I wanted to make 1.9.3 run as my default so I ran:

rvm use 1.9.3 –default

Next – PLEASE READ CAREFULLY BEFORE EXECUTING – I ran the following command which GAVE ME SOME ERRORS:

gem install slanger

Slanger 0.3.7 has some issues with version dependencies with `rack` and `sinatra` and so the command spit out:

ERROR: While executing gem … (Gem::DependencyError)
Unable to resolve dependencies: slanger requires rack (~> 1.5);
thin requires rack (>= 1.0.0); sinatra requires rack (< 1.5, ~> 1.1)

You may be able to run that command without any problem (after slanger is updated) but as of right now you need to install an older version of slanger IF THE PREVIOUS COMMAND DOES NOT WORK.

So you can try:

gem install slanger -v=0.3.6

You also need to have redis-server so run:

gem install redis-server

Next you can start the redis-server with:

redis start

Similarly you can stop redis with

redis stop // don’t run this right now – it’s in case you need it later

If everything worked well you can just run `slanger` with:

slanger –app_key 765ec374ae0a69f4ce44 –secret your-pusher-secret

But if that gives you an error about:

/usr/local/rvm/gems/ruby-1.9.3-p429/gems/slanger-0.3.6/bin/slanger:106:
in `block in ‘: uninitialized constant Slanger::VERSION (NameError)

Then you need to make a small edit until slanger is updated.

Edit the file referenced in the error, at the line referenced (106):

/usr/local/rvm/gems/ruby-1.9.3-p429/gems/slanger-0.3.6/bin/slanger

And it has this line of code:

puts “Running Slanger v.#{Slanger::VERSION}”

I just commented that line out

#puts “Running Slanger v.#{Slanger::VERSION}”

And voila it works!

Slanger API server listening on port 4567
Slanger WebSocket server listening on port 8080

The [github issues page](https://github.com/stevegraham/slanger/issues) is also a good resource but just don’t try and install slanger inside inside another app. Read the readme:

Slanger is intended as a server that is easy to install,
not a gem inside Rails or Sinatra.

Posted in Tech Tips, Web Development | Tagged , , , , | Leave a comment

Amazon Coins

Today Amazon has announced Amazon Coins which can be used to purchase games and apps in the online web store.

Here is an image of one fo the Amazon Coins:

Amazon Coins

Amazon says that their selection is growing exponentially and has increased by 25% in the last three months.

Amazon Coins

Posted in Marketing | Tagged , , | Leave a comment

Block Coral Cache / Coral CDN

Deny CoralCache from Indexing Your Site

CoralCache aka Coral CDN gives users access to a sort of ‘cached’ copy of your website, in case your site were to be offline. You can also set up your site to serve images and assets from the CoralCache CDN url – by appending `.nyud.net` to your domain name.

If you don’t like the idea of a copy of your site floating around out there, you’re not alone.

There is a bit of good news about how CoralCDN works, though:

1. It blocks content from being indexed at the cached location. Just try and visit the cached site’s `/robots.txt`
1. It only caches content that has been requested. It won’t crawl your website and create an entire cache of the site. That is, only when people try to browse your site and append the `nyud.net` will the CoralCache server crawl your site and index the requested pages and assets.
1. It does respect `expires` headers sent with the content

Now, how do you block CoralCache from indexing your site?

If you have WordPress add this to the very top of your `wp-config.php` file, right below the opening `< ?php` tag. It works even if you are using `WP SuperCache` in PHP mode: if(!empty($_SERVER['HTTP_USER_AGENT']) && stripos($_SERVER['HTTP_USER_AGENT'], 'CoralWebPrx') !== false)tested { echo 'No caching allowed for CoralCache / CoralCDN'; echo "

You can test it out with this page: techblog.willshouse.com.nyud.net/2013/05/13/block-coral-cache-coral-cdn

If you try to test this you’ll need to test it on a page of your site that has not recently been requested via the CoralCDN – or wait until the cache times out. It should display the message briefly and then redirect to the corresponding page on your website.

Posted in Tech Tips | Tagged | Leave a comment

Google Product Category Browser

Google says:

> Products are categorized in our search results based on a number of factors. While we can’t guarantee that a product will show in a particular category, you can increase the chances that your products will be included in relevant categories by sending us highly structured information for your items.

Continue reading

Posted in Marketing | Tagged , | Leave a comment

DSpace: No matches for the query (OAI-PMH)

After a recent upgrade to DSpace 3.1 (from 1.7 to 1.8 to 3.x) there was a problem getting the OAI-PMH working.

When visting the OAI harvester’s URL there was an error:

> No matches for the query

DSpace: No matches for the query (OAI-PMH)

You can most likely use the default OAI configuration file:

[dspace]/config/modules/oai.cfg

You will need to run one of these commands to get your index:

[dspace]/bin/dspace oai import

Or if you want to clear your index out and rebuild it, i.e. erase existing records from the solr oai index (won’t delete your dspace records) then use:

[dspace]/bin/dspace oai import -c

I checked the `/var/log/tomcat6/catalina.out` when running this and saw a note that said that I had run out of disk space when doing this. That was one problem.

The other problem was that I actually needed to edit my `[dspace]/config/modules/oai.cfg` file and update my identifier prefix and url.

The value for `identifier.prefix` should probably `yourdomain.edu` without the http, and the `bitstream.baseUrl` should probably be `http://yourdomain.edu` with the http. Don’t put a trailing slash on either one.

Also, unless you have a specific reason to change the other settings, leave them the same. They are internal URLs:

# Storage: solr | database
storage=solr

# Base solr index
solr.url=http://localhost:8080/solr/oai

After updating the settings I restarted tomcat, then re-ran the index with the `-c` option as mentioned previously, and then the OAI-PMH started working again.

DSpace: No matches for the query (OAI-PMH)

For good measure I also deleted the files out of the `requests` subdirectory of my `cache.dir` directory (see your `oai.cfg` file for that location.)

Posted in Software, Tech Opinion | Tagged , | 3 Comments

PHP: Convert Ascii To Hex

PHP: Convert Ascii To Hex
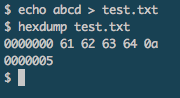
When working in PHP there are times when I want to see what a string is in HEX – a lot of times there are invisible characters that or non-printing strings that can throw your program or script for a loop.

If you save the string to a text file, you can use a hex editor utility, like `hexdump` to take a look at the hex codes of the ASCII characters:

$ echo abcd > test.txt
$ hexdump test.txt
0000000 61 62 63 64 0a
0000005
$

Now for the PHP version:

header(‘Content-type: text/plain; charset=utf-8’);

$ascii = ‘abcd’;
$hex = unpack(‘H*’,$ascii);

// you can print out the hex result of the ascii conversion:

print_r($hex);

# Array
# (
# [1] => 61626364
# )

// or for a nicer display you can add spaces between every two characters
// and wrap the column every 6 characters (change to fit your needs)

echo wordwrap(implode(‘ ‘, str_split($hex[1], 2)), 6);

# 61 62
# 63 64

Posted in Tech Tips, Web Development | Tagged , , | Leave a comment

What is a Jewelers’ Markup?

What is a Jewelers’ Markup?Jewelers may markup items depending on their typical client, their volume and velocity of sales, their location, marketing, and many other factors. Below are a few testimonials and quotes which will give you a typical idea of how much Jewelers’ markup their Jewelry / markup on diamonds and other precious stones:

> The retail markup on jewelry can range from 100% to 300% or even more. Of course, this is a fact that jewelers absolutely don’t want you to know.

> Jewelry is a product that people don’t buy everyday and jewelry stores only turn their pricey inventory about once a year, so the markup is generally 100 percent.

> I’ve heard anectdotally (no cite) that 200% markup is not unusual at the higher end stores.

> As an employee I got a 50% discount on anything I bought at the store.

> I’ve seen indicate that 300% is not an unusual markup. Your acquaintance who says he bought a $10,000 ring for $1,000 might be on the level. While a 1000% markup is not typical, it’s not unheard-of.

High retail prices might encourage people to buy diamonds online – especially if the seller is reputable and has a good return policy.

Posted in Marketing | Tagged | Leave a comment

How use crontab / cron with Jailkit on Ubuntu 12

How use crontab / cron with Jailkit on Ubuntu 12Recently I began testing `jailkit` on Ubuntu 12 and 12.04 and wanted users to have access to `cron` and `crontab`

I read a lot of the documentation for `man cron` and have a pretty good understanding of how Vixie Cron works.

There is a bit of a conflict with permissions of Cron and Jailkit.

Jailkit wants most everything inside the jail (most often `/home/jail/`) to be owned by `root` and in the `root` group, and basically nothing to be writable by the jailed users (except for `/home/jail/tmp/` and the users home directories in `/home/jail/home/*`)

Cron, on the other hand, doesn’t want you to edit the crontab files for the users directly. They live in `/var/spool/cron/crontabs`

> cron searches its spool area (/var/spool/cron/crontabs) for crontab files (which are named after accounts in /etc/passwd); crontabs found are loaded into memory. Note that crontabs in this directory should not be accessed directly – the crontab command should be used to access and update them.

More information is given from `man crontab`:

> There is one file for each user’s crontab under the /var/spool/cron/crontabs directory. Users are not allowed to edit the files under that directory directly to ensure that only users allowed by the system to run periodic tasks can add them, and only syntactically correct crontabs will be written there. This is enforced by having the directory writable only by the crontab group and configuring crontab command with the setgid bid set for that specific group.

That’s great, but…

##How do I set up crontab with Jailkit on Ubuntu?

Disclaimer: This may not be 100% correct but it worked for me.

First, hardlink the crontab directory into your jail:

jk_cp -vkof /home/jail /var/spool/cron/crontabs

-v – verbose
-k – hardlink
-o – owner – Retains the file ownership and group when copying files and directories.
-f – force – Force overwriting of existing files

This will only do the directory so you may need to hardlink the individual files inside of the crontabs folder afterwards using `ln` without the normal symlink method of `ln -s`… and remember, **hardlinks are generally very bad so don’t get into the habit of using them.** However, after a user has been `chrooted` symlinks will appear broken so they are not an option here.

The ownership and permissions on this folder, inside the jail, need to match the permissions of the real files. That is, the folder should be owned by `root` and have the group `crontab` with permissions listed as `drwx-wx–T`

Inside the crontab folder, each user who needs to edit a crontab needs their file hardlinked into the jailed `/var/spool/cron/crontabs` folder and the hardlinks need to be owned by the user and of have the group `crontab` and the permissions need to be set as `-rw——-`

**Update** – hard links won’t work because when using `crontab` to edit the files, well, it doesn’t actually edit them. It deletes them and replaces them. Here’s the solution I’ve found instead:

Use the command mentioned earlier to copy the `crontabs` directory:

jk_cp -vkof /home/jail /var/spool/cron/crontabs

Now remove that last directory:

sudo rm -R /home/jail/var/spool/cron/crontabs

The parent directories will still exist. Now recreate that directory:

sudo mkdir /home/jail/var/spool/cron/crontabs

Next you will need to edit `/etc/fstab` and create a binding. If you aren’t *very careful* editing this file may brick your system – not immediately but it may keep it from booting up. First create a copy of the file:

sudo cp /etc/fstab ~/fstab

Now you can edit the file with something like:

vi /etc/fstab

What you’ll do is create a binding so that the real crontab directory is available in two places. You had to create the other directory as a mount point (and remove the files / folder first). So on the last line of /etc/fstab add something like:

/var/spool/cron/crontabs /home/jail/var/spool/cron/crontabs none bind

If you mess anything up in this file and your system won’t boot, you will need to get your system into recovery mode where you can make changes to the `/etc/fstab` file (attach the drive to a working system) and fix it.

Once that is done you can run:

mount /home/jail/var/spool/cron/crontabs

Now `/home/jail/var/spool/cron/crontabs` is bound to `/var/spool/cron/crontabs` – it is sort of like a symlink at the system level. Check out `man bind` and `man fstab` for more info.

You will also need to use jk_cp to copy in the `/usr/bin/crontab` binary file so your users can edit the crontabs. However, the permissions and ownership on the file are very important.

jk_cp -vof /home/jail /usr/bin/crontab

Again, they should match the permissions and ownership of the real file, and you WILL need to manually set this after using jk_cp to copy the file to the jail.

If you jail home is `/home/jail` you can do something like:

chmod g+s /home/jail/usr/bin/crontab

The `/usr/bin/crontab` file should be owned by `root` and of the group `crontab` with the `setgid` bit set (g+s) so that when it is executed it runs as the group’s owner (i.e. crontab) – so the permissions should look like `-rwxr-sr-x` – check this by running:

ls -l /home/jail/usr/bin/crontab

The only other tricky bit is that if you create a new user on your system you will need to create a crontab file for them – perhaps using something like `su crontab -e -u mynewuser` and then save / exit your editor.

You will now need to manually create a hardlink from the jail’s crontab file to the real one:

`/var/spool/cron/crontabs/mynewuser` will be hardlinked as `/home/jail/var/spool/cron/crontabs/mynewuser`

As root you can do something like:

cd /home/jail/var/spool/cron/crontabs/
ln /var/spool/cron/crontabs/mynewuser

Again, check the permissions match as mentioned above. Good luck.

Posted in Server Administration | Tagged , , , | Leave a comment