Google Apps Changes – Round 2

Google Apps Changes – Round 2

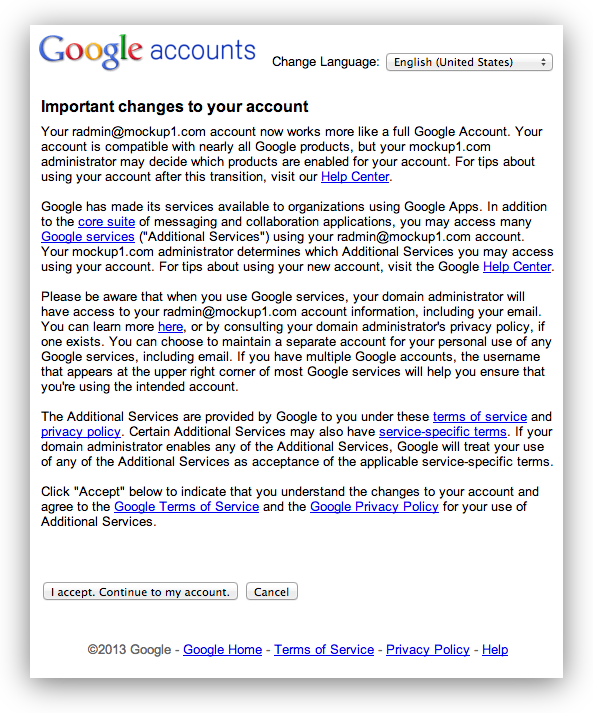
##Google Apps has changed

We transitioned your account to our new infrastructure for Google Apps on May 31, 2011 to make more Google services available to your organization. Here’s what this means for you:

In addition to the core suite of messaging and collaboration applications, your users may now access many more Google services.

You will retain control over which Google services your users can access.

This update is free, and Google automatically made the transition for you on May 31, 2011. By default, we have turned services outside of Google’s core suite of messaging and collaboration applications ON. You can manage your on/off controls in the Organization & users tab.
Agree to the following before signing into control panel

– I have read and I understand the transition.
– I understand that these additional services are only covered by self-service online support, that they may not be SAS 70 compliant, and that the Google Apps uptime SLA does not apply. By checking this box I agree to Additional Terms for services made available with the new accounts infrastructure.

Learn about the users we transitioned in your organization that have conflicting accounts.

Posted in Marketing, Tech Tips | Tagged , | Leave a comment

Google Apps Changes – First Round

Important changes to your account

Google Apps Changes – First Round

Your [email protected] account now works more like a full Google Account. Your account is compatible with nearly all Google products, but your yoursite.com administrator may decide which products are enabled for your account. For tips about using your account after this transition, visit our Help Center.

Google has made its services available to organizations using Google Apps. In addition to the core suite of messaging and collaboration applications, you may access many Google services (“Additional Services”) using your [email protected] account. Your yoursite.com administrator determines which Additional Services you may access using your account. For tips about using your new account, visit the Google Help Center.

Please be aware that when you use Google services, your domain administrator will have access to your [email protected] account information, including your email. You can learn more here, or by consulting your domain administrator’s privacy policy, if one exists. You can choose to maintain a separate account for your personal use of any Google services, including email. If you have multiple Google accounts, the username that appears at the upper right corner of most Google services will help you ensure that you’re using the intended account.

The Additional Services are provided by Google to you under these terms of service and privacy policy. Certain Additional Services may also have service-specific terms. If your domain administrator enables any of the Additional Services, Google will treat your use of any of the Additional Services as acceptance of the applicable service-specific terms.

Click “Accept” below to indicate that you understand the changes to your account and agree to the Google Terms of Service and the Google Privacy Policy for your use of Additional Services.

Posted in Marketing | Tagged | Leave a comment

DIR-601 Firmware v 1.04

DIR-601 Firmware v 1.04

You have to visit the [CA version of the router’s site](http://www.dlink.com/ca/en/support/product/dir-601-wireless-n-150-home-router?revision=ca_reva) to get the 1.04 version, which only boasts one extra feature:

DIR-601 Firmware v 1.04

> Enhance WPS-Pin security concern

Hope this helps!

You can find the other firmware in the FTP directory at:

ftp://ftp.dlink.com/Gateway/dir601/Firmware/

Posted in Tech Tips | Tagged | Leave a comment

Road Runner National Help Desk – Phone Number

Time Warner Cable lists their national number as 877-777-6126 but for Road Runner National Help Desk the best number is actually 877-318-8333.

Posted in Tech Tips | Tagged | Leave a comment

Chef – ERROR: EOFError: end of file reached

Recently when using opscode’s chef server and knife I was getting the error message:

> ERROR: EOFError: end of file reached

When trying to execute commands like `knife client list`

I ended up finding out that the problem has to do with how the configuration for chef 11 has changed from chef 10.

In your `knife.rb` file there is a line that gives you the default address / address of your cloud server – you will even see the default if you are running the interactive knife configuration tool (`knife configure -i`):

> Please enter the chef server URL: [http://chef.example.com:4000]

The big changes for chef 11 are two hard to spot things for the new chef server / knife access url: `https://chef.example.com`

1. Port 4000 goes away
2. The server now runs on HTTPS / SSL (which implies port 443)

Change this to use SSL / HTTPS and your `ERROR: EOFError: end of file reached` message will go away. I was getting that error when trying to access chef on port `5672` which is the port that RabbitMQ runs on.

Posted in Linux, Tech Tips | Tagged , | Leave a comment

How to insert a photo from Media Gallery into WordPress

Problem: I am trying to make a post. I have a loaded in our Media Gallery but when I go to the post and try to put in the post I can’t get to it.

Solution: try clicking on the left hand column that says gallery / all images

Visual Example:

How to insert a photo from Media Gallery into WordPress

Steps:

  1. Click Add Media
  2. Choose Insert Media
  3. Choose Media Library
  4. Click on the photo, image, picture you want to insert
  5. Click “Insert Into Post”
Posted in Tech Tips, Web Development | Tagged , | Leave a comment

RabbitMQ: users disappear / settings gone after reboot / restart

RabbitMQ: users disappear / settings gone after reboot / restart
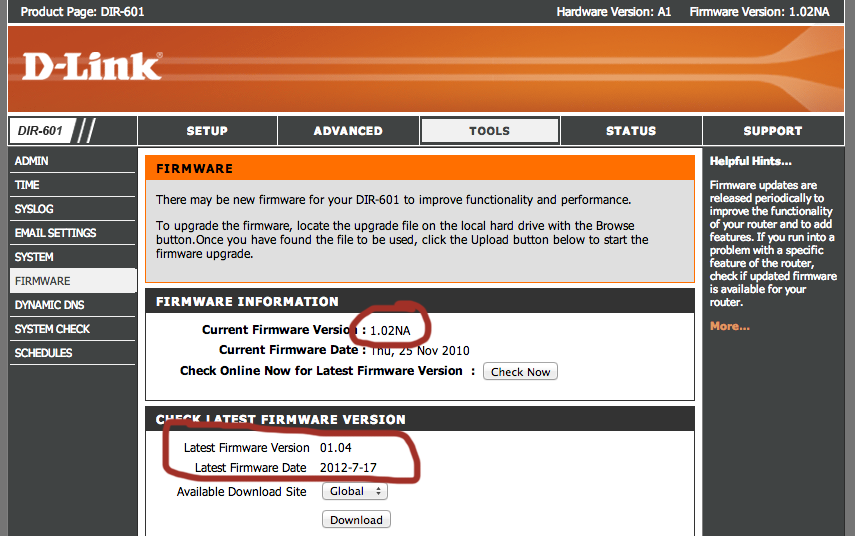
If you are using RabbitMQ on am Amazon EC2 instance and your node settings and users seem to disappear on reboot, it may be because of how the RabbitMQ server works.

Settings, users, vhosts, and the rest of the RabbitMQ are all bound based on the node name – or the hostname. You can check by running either `hostname` or `hostname -f` for the FQDN.

You will also notice that RabbitMQ stores settings in:

/var/lib/rabbitmq/

And more specifically in:

/var/lib/rabbitmq/mnesia

If you check the contents you will see something like:

drwxr-xr-x 5 rabbitmq rabbitmq 4096 Feb 27 14:55 rabbit@ip-10-110-58-254/
drwxr-xr-x 2 rabbitmq rabbitmq 4096 Feb 27 14:55 rabbit@ip-10-110-58-254-plugins-expand/
drwxr-xr-x 5 rabbitmq rabbitmq 4096 Feb 25 15:08 rabbit@ip-10-21-004-149/
drwxr-xr-x 2 rabbitmq rabbitmq 4096 Feb 25 14:41 rabbit@ip-10-21-004-149-plugins-expand/
drwxr-xr-x 5 rabbitmq rabbitmq 4096 Feb 23 04:48 rabbit@ip-10-21-043-37/
-rw-r–r– 1 rabbitmq rabbitmq 5 Feb 23 04:41 [email protected]
drwxr-xr-x 2 rabbitmq rabbitmq 4096 Feb 23 04:41 rabbit@ip-10-21-043-37-plugins-expand/
drwxr-xr-x 4 rabbitmq rabbitmq 4096 Feb 18 17:31 rabbit@ip-10-21-05-95/
drwxr-xr-x 2 rabbitmq rabbitmq 4096 Feb 18 17:28 rabbit@ip-10-21-05-95-plugins-expand/
drwxr-xr-x 4 rabbitmq rabbitmq 4096 Feb 26 15:32 rabbit@ip-10-21-037-208/
drwxr-xr-x 2 rabbitmq rabbitmq 4096 Feb 26 15:26 rabbit@ip-10-21-037-208-plugins-expand/

##Why do RabbitMQ settings disappear on restart?

Well, if you “stop” an amazon ec2 instance and then “start” it, it will have a new IP address unless you are using static IP addresses. Note that this doesn’t happen on “reboots” – just “stop” and “start” for EBS / (Elastic Block Storage) volumes. If you are not using an EBS volume then the whole settings directory will get erased when you stop/start the instance – so look into EBS if you are not using them.

The RabbitMQ server binds settings by default to the FQDN which with amazon ec2 is tied to the IP address / Amazon internal DNS system.

One way to resolve this issue would be to use a static IP address and make sure it gets assigned on startup.

Another way would be to create a file here:

/etc/rabbitmq/rabbitmq.conf.d/hostname.conf

With the contents:

NODENAME=rabbit@localhost

That works on Ubuntu 12.04.

Posted in Linux, Server Administration | 3 Comments

Chef: Configure a Workstation

Chef: Configure a Workstation

On Mac OSX I would recommend first installing hombrew’s ruby-env and then the latest version of ruby/gems

Then you can do:

gem install chef –no-ri –no-rdoc
gem install knife –no-ri –no-rdoc

I think by default these files go in these locations:

USERNAME.pem ~/.chef
validation.pem ~/.chef

knife has an interactive setup tool invoked by `knife configure`

Posted in Uncategorized | Leave a comment

VideoJS m3u8 example

Here is an example of how to use video.js with HTTP Live Streaming (HLS) with an m3u8 playlist file:

< !doctype html>


[via](https://gist.github.com/lieldulev/3738681)

Posted in Web Development | Tagged , , , | 3 Comments

chef knife setup

For more info you can visit the [knife configuration page](http://wiki.opscode.com/display/chef/Knife) on opscode

% knife –help
Usage: knife sub-command (options)
-s, –server-url URL Chef Server URL
-k, –key KEY API Client Key
–[no-]color Use colored output, defaults to enabled
-c, –config CONFIG The configuration file to use
–defaults Accept default values for all questions
-d, –disable-editing Do not open EDITOR, just accept the data as is
-e, –editor EDITOR Set the editor to use for interactive commands
-E, –environment ENVIRONMENT Set the Chef environment
-F, –format FORMAT Which format to use for output
-u, –user USER API Client Username
–print-after Show the data after a destructive operation
-V, –verbose More verbose output. Use twice for max verbosity
-v, –version Show chef version
-y, –yes Say yes to all prompts for confirmation
-h, –help Show this message

Posted in Tech Tips | Tagged , , , | Leave a comment