AWS re: Invent Conference Details Available Now

AWS re: Invent
 
We are excited to share more details about AWS re: Invent, our first global customer and partner conference. Join the best and the brightest developers, hottest start-ups, and visionary technology leaders in Las Vegas, November 27-29 and be part of the largest gathering of the AWS community.


Important Details
Full Conference Pass: $1099
Registration Open Date: July 25, 2012
Add to Outlook Calendar Add to iCal Add to Gmail Calendar

Find the latest information on tracks, sessions, and speakers on the AWS re: Invent website. We have built the agenda around topics requested by customers. Choose from over 150 sessions led by AWS engineers and architects, product managers, AWS customers and partners, including:

AWS Best Practices Compute & Networking, Databases, Storage, Content Delivery…
Cloud Computing Use Case Web apps, Big data, High performance computing, Disaster recovery, Mobile, Media sharing…
Enterprise IT Migrating enterprise apps to the cloud, Governance and security best practices, Customer case studies…
Architecture High availability best practices, Scaling and Performance Tuning, Networking architectures…
Developer Tools Using AWS SDKs for your favorite language, Architecting for cost savings, Deployment management tools from AWS and partners…
AWS Resource Management Tips for lowering your bill, DevOps in the cloud, Automation and deployment best practices, Performance optimization, Testing…
Security Cloud Security best practices, Building PCI and HIPAA Compliant apps, Identity and access management…
New AWS Services How to get started with recently launched services like Amazon DynamoDB, Amazon CloudSearch, Amazon Simple Workflow Service…
Service Team Office Hours Connect with engineers and product managers to get your technical questions answered
 
Mark your Outlook, iCal or Gmail calendar to register when registration opens.
We look forward to seeing you in November!

Best regards,
The Amazon Web Services team

reinvent.awsevents.com
Posted in Server Admin, Social Media, Web Development | Tagged , , , | 1 Comment

Quicksilver Plugin Tutorial – Basic Tutorial (Draft)

This page is an archived version of http://quicksilver.infogami.com/ObjectiveCPlugInsBasicTutorial

Quicksilver

Basic Tutorial (Draft)


Introduction

A brief tutorial showing the creation, installation, and running of a Quicksilver plug-in (Objective-C) implementing a simple action.

Set-up

Ensure a development version of Quicksilver is installed (I put mine under ~/Applications/).

Ensure Developer Tools is installed (I’ve got whichever one gives me Xcode 2.4).

Follow the plug-in template installation instructions (Note that there is an important step involving telling Xcode where certain Quicksilver frameworks live – hint: they live inside the development version of Quicksilver which should now be installed.).

Implementation

Launch Xcode if it’s not already launched.

From the Assistant (or File -> New Project), choose to create a ‘Quicksilver Plug-in’ (You’ll likely choose a location for your project and a name — I’m going to use ‘MyPlugIn’ as a name for this tutorial).

Edit Info.plist to make the content as follows (A plug-in’s Info.plist allows a plug-in to communicate details about itself to Quicksilver (e.g. whether the plug-in provides an action)):

< ?xml version="1.0" encoding="UTF-8"?>
< !DOCTYPE plist PUBLIC "-//Apple Computer//DTD PLIST 1.0//EN" "http://www.apple.com/DTDs/PropertyList-1.0.dtd">
CFBundleDevelopmentRegion
English
CFBundleExecutable
MyPlugIn
CFBundleIdentifier
com.blacktree.Quicksilver.MyPlugIn
CFBundleInfoDictionaryVersion
6.0
CFBundleName
MyPlugIn
CFBundlePackageType
BNDL
CFBundleVersion
1A
QSActions

MyPlugInAction

actionClass
MyPlugInActionProvider
actionSelector
performMyAction:
directTypes

NSStringPboardType

name
My Action

QSPlugIn

author
An Author

QSRegistration

QSActionProviders

MyPlugInActionProvider

Edit MyPlugIn.h to make the content:

//
// MyPlugIn.h
// MyPlugIn
//

#import

@interface MyPlugInActionProvider : NSObject
{
}
@end

Edit MyPlugIn.m to make the content:

//
// MyPlugIn.m
// MyPlugIn
//

#import “MyPlugIn.h”

#import
#import

#import

@implementation MyPlugInActionProvider

– (QSObject *) performMyAction:(QSObject *)dObject
{
NSString *text = [dObject objectForType:QSTextType];
NSAssert1(text, @”Error: failed to obtain string from: %@”, dObject);
NSDictionary *attributes = \
[NSDictionary dictionaryWithObjectsAndKeys:@”My Action”, QSNotifierTitle,
text, QSNotifierText, nil];
NSAssert(attributes, @”Error: failed to create dictionary for notification”);
QSShowNotifierWithAttributes(attributes);

return nil;
}

@end

Save your changes.

Build (this should result in the creation of ‘MyPlugIn.qsplugin’).

Installation

Double-click MyPlugIn.qsplugin to initiate plug-in installation.

Answer appropriately when asked by Quicksilver about installing (Plug-ins are installed under ~/Library/Application Support/Quicksilver/).

Testing/Running

Ensure Quicksilver is running.

Activate Quicksilver.

Enter text entry mode (hint: use the period key).

Type some text (how about ‘Would you like to play a green vegetable?’ ?)

Choose ‘My Action’ as the action.

Press the return key.

If all went well, you should be notified by Quicksilver of the text you entered via text entry mode (If not, time to check out Console.app).

References

Posted in Software | Tagged , | Leave a comment

Spam: College Collaborative Networks

I got the following spam message below for the “College Collaborative Networks” which looks like a really shady scam and attempt at targeting people who sign up with junk mail.

The domain referenced in the e-mail is ccnets.org but the one that loads in the browser is actually weavespace.com. The unsubscribe e-mail address, which I would not recommend e-mailing, is of the domain wikinets.org.

I would recommend marking this unsolicited e-mail as spam and deleting it. Leave note below if you received a similar e-mail.

> Dear University Users,
>
> The College Collaborative Networks at http://www.ccnets.org is now open for sign up
>
> While a social network is for sharing of personal news and events, a college collaborative network is for sharing of resources (including data, knowledge and tools) among its members (faculty, staff, students and alumni). In the simplest case members can collaborate to create a comprehensive repository of resources. As specific needs arise further collaborations among individual members can spin off more collaborative networks.
>
> With a free membership you are entitled to share, and contribute, resources in the network, and connect to other networks including various knowledge collaborative networks across campuses. You are also entitled to create your own collaborative networks of any kind so others can join.
>
> We look forward to your participation!
>
> Sincerely,
> Jeff Kitson
> [email protected]
> College Collaborative Networks
>
> We apologize if you recevive multiple copies of this message; to unscubscribe please mailto:[email protected].

Spam College Collaborative Networks

Posted in Random | Tagged , , , , | 1 Comment

It Works!

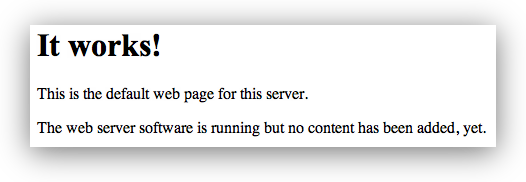
After installing apache on the system for the first time, there will be an `index.html` file in your `/var/www folder` (Debian systems). The file is also located somewhere such as `/usr/share/apache2/default-site/index.html`. When displayed the content looks like this:

It works!

This is the default web page for this server.

The web server software is running but no content has been added, yet.

The content for the file is as follows:

It works!

This is the default web page for this server.

The web server software is running but no content has been added, yet.

It Works

Posted in Linux, Server Admin, Tech Tips, Web Development | Tagged , , | 1 Comment

Using Apple Remote Desktop On Mac OSX – Tutorial

Here is a brief tutorial on using Remote Desktop On Mac OS X

Now there are sort of two “flavors of Remote Desktop”

###Remote Desktop Connection for Mac

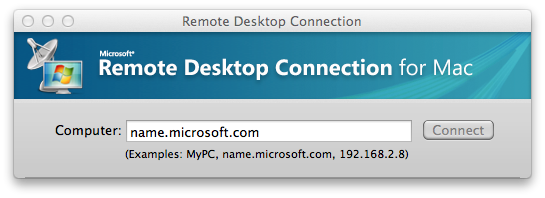
The first is for connecting to a PC / Windows Box from a Mac and it is called “Remote Desktop Connection” and has a file name `Remote Desktop Connection.app`

Picture

All I’m going to say about this one is where to download it, because you probably already know how to use it (and there are a lot of guides out there).

###Apple Remote Desktop

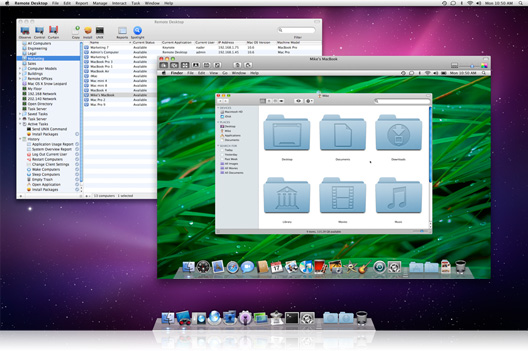
The Second is Called “Apple Remote Desktop” or “Apple Remote Desktop 3.5” and has a file name `Remote Desktop.app`

Using Apple Remote Desktop On Mac Osx Tutorial

This is the one we’ll be focusing on.

The first step is to download it. The web page is here which is basically a link to the App Store. It costs about $80.

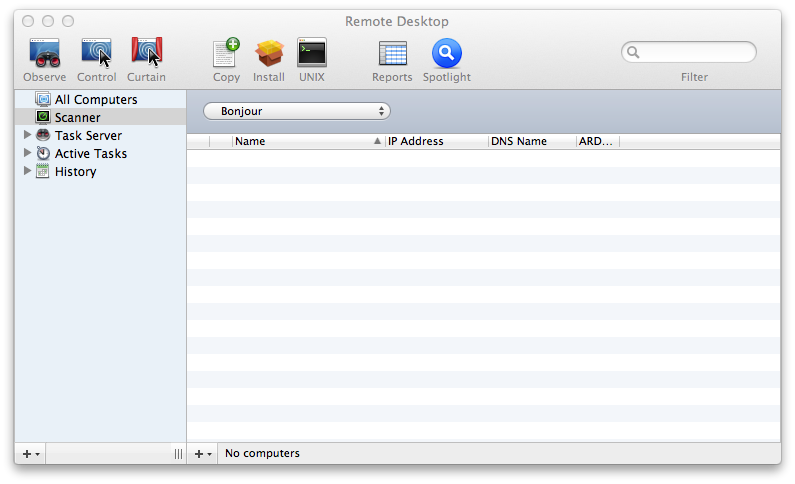
After you download / install Using Apple Remote Desktop you will have a Remote Desktop management screen that looks something like this:

Remote Desktop On Mac Osx Tutorial

Next, on the remote computers you want to observe / manage / control you will need to install the Apple Remote Desktop Client (version 3.5.3 linked).

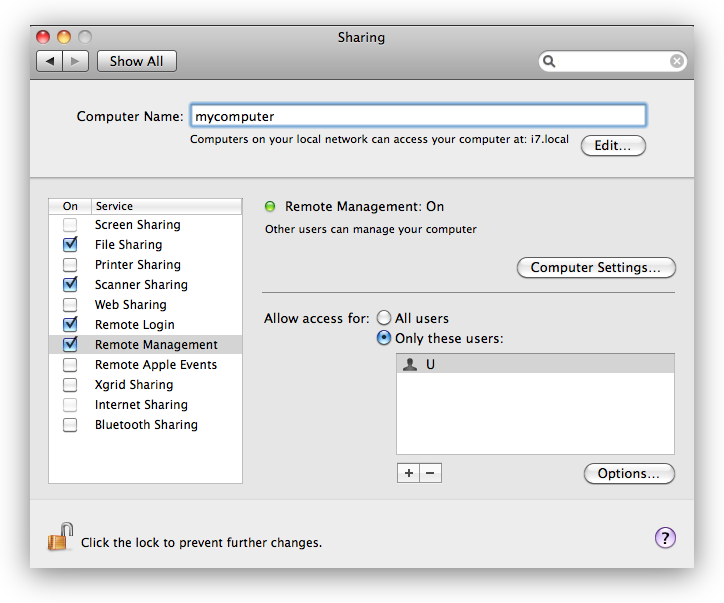
After installing the client on the remote machine, make sure to also set the remote desktop / remote management “Sharing” preferences in System Preferences:

Remote Management Sharing Preferences In System Preferences

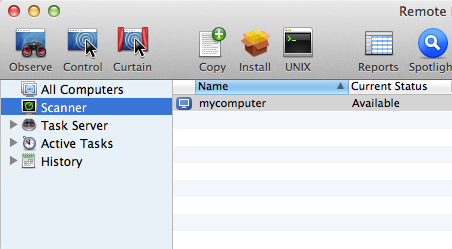
Now on your management computer you should see the remote computer show up in the Scanner tab of Remote Desktop – at this point you can “add it” so that it will show up in the “All Computers” section

Remote Computer Show Up In The Scanner Tab Of Remote Desktop

Posted in Mac, Server Admin, Server Administration, Tech Tips | Tagged , , | Leave a comment

Lion: Set External Display As Primary

Instructions for setting an external monitor as the primary display on Mac OS X Lion.

First – open Displays Preference Pane
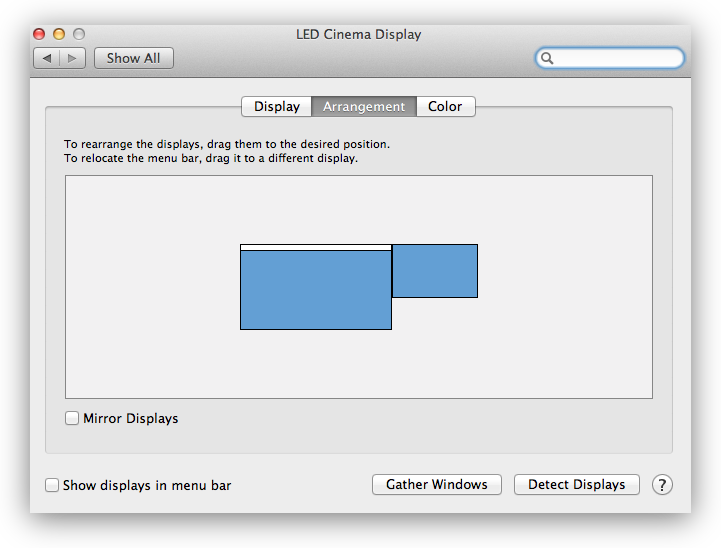
Next, choose the “Arrangement” tab

Lion Set External Display As Primary

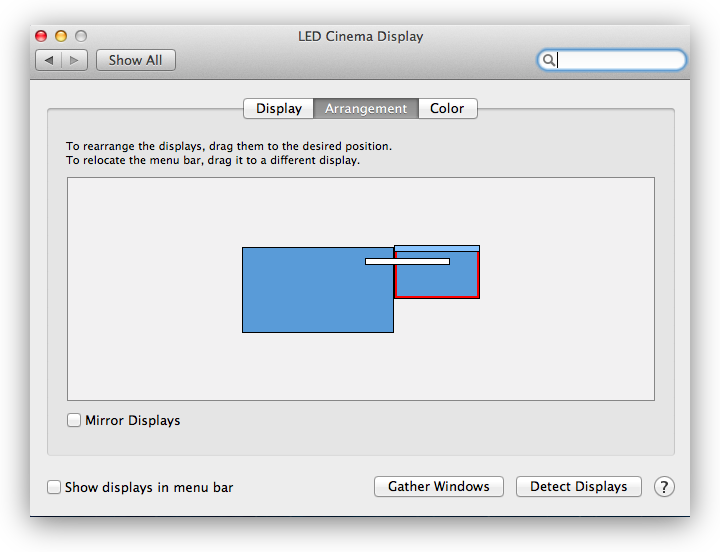
The key here is that you need to drag the white bar from one of the displays to the other one as shown in the screen shot below:

Lion Set External Monitor As Primary On Os X

Posted in Mac, Tech Tips | Tagged , , , | 1 Comment

WordPress: Sticky vs Announcement

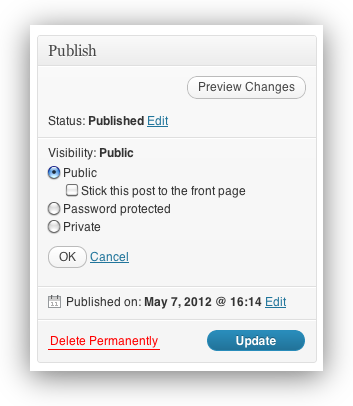
Wordpress  Sticky Vs AnnouncementWordPress has a built-in feature for creating a “Sticky” post, which will allow it to sit above all of the other posts in the news stream / blog stream.
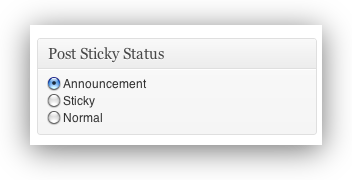
There is also a little plugin called “WP-Sticky” that will allow you to change a post’s sticky status, or as it is labeled “Post Sticky Status” to be of the following types:

– Announcement
– Sticky
– Normal

Wp Sticky

The difference between “Sticky” and “Announcement” is a minor one:

– Announcement keeps the post at the top of your blog no matter what.

– Sticky post status keeps the post at the top of whatever page it is on.

To give an example, when a post is set as sticky and it is one of the 10 most recent posts, it will be at the top of the homepage (if your pagination is set to 10 posts per page, as is default).

However, when that post becomes 11th – 20th in queue, it will be “sticky” at post #11, or the top of page 2.

It is important to note that the WP-Sticky plugin actually won’t affect WordPress’ own “sticky” status. A little confusing but this is good to know.

Posted in Tech Tips, Web Development | Tagged , , | Leave a comment

iCal 4.0 Help: Making an event or to-do item private

##iCal 4.0 Help

###Making an event or to-do item private

If your calendar is administered through a CalDAV server or Microsoft Exchange Server 2007 (for example, through your workplace), you can make an event or to-do item private. Private events and to-do items can

Posted in Mac, Tech Tips | Tagged , , , , | Leave a comment

Multiple People Edit Google Place [Solved]

###Why doesn’t Google Places allow access by multiple users?

*Transcript*
Today is more of a feature request. Um, it’s a question from the excellent Jonathan Hochman in Connecticut. Jonathan asks: “It’s not good for security when I have to ask clients to share their Google credentials with me so I can help edit their Google Places listings. Why doesn’t Google Places allow access by multiple users, like Google Webmaster Tools does?” Ok, well first off, I’m not responsible for Google Places so the best I can do is say, that’s a good feature request, I’ll pass it on to them. The way to think about these things is that typically there is a spectrum of sophistication, and how far along these things are developed. So, AdWords had the ability to you know, manage things on behalf of your clients relatively early on. Google Webmaster tools has done better about allowing delegation, but it’s still not perfect, but it’s a lot better than it was a little while ago. Google Places is even newer than Google Webmaster Tools, so it’ll probably take some time before they think about, you know, the ability to delegate, the ability to let you manage things on you’re clients behalf. Um, but just to put stuff in perspective, I was reading -Tamar Weinberg had written a letter about-she became an administrator of Fan Page on Facebook. And it looked like it was permanent; it didn’t look like you could change the administrator. So all of this stuff in my opinion, tends to get, you know from the initial stages that are a little rougher, that don’t have as fine granularity on the controls, to more advanced, more sophisticated over time. And so I do think that all of these things will get better. Um, I’ll pass that feature request on to Google Places, because we never want people to have to trade credentials. Worst case, you want to maybe allow some OAuth or something where you’re not giving out your password. Um, but at the same time the Google Places team is chugging and crunching on a bunch of other functionality. But it would be nice if something like that were offered, so I’ll pass that request on. Thank you.

##Solution

*Problem*

We’d like to grant one of our employees access to our Places listing, so that they can enter Coupons.

There doesn’t seem to be a way to do this — only one e-mail address can govern a business listing — is this correct?
The help file suggests that this is the case, and recommends using a general e-mail address for forming ownership.

*Answer*

There is not a way to grant multiple Google Accounts access to one Google Places account. That’s why we recommend using a general email address from the business’ email domain as the login email address. If you’re looking to transfer ownership, here’s what I’d do.

1. Set up a new Google Places account using a general @chain-name.com login email address.
2. Go through the Add Listing process to add the business to your account, then verify it using PIN verification. There’s not an expedited version of this, it will take 2-3 weeks.
3. After the listing is verified in the new account, delete it from the old account.
4. Voila you’ve moved the listing.

Posted in Social Media, Web Development | Tagged , , | Leave a comment

Pianobar / Cinema Display Speakers

I just realized that if you’re using Pianobar on Mac OS X and you connect a Cinema Display, the default speakers won’t change to the Cinema Display by default. This is a little bit troublesome – but it is not impossible to fix.

You may need to restart Pianobar after making the change as it uses the libao cross platform audio library.

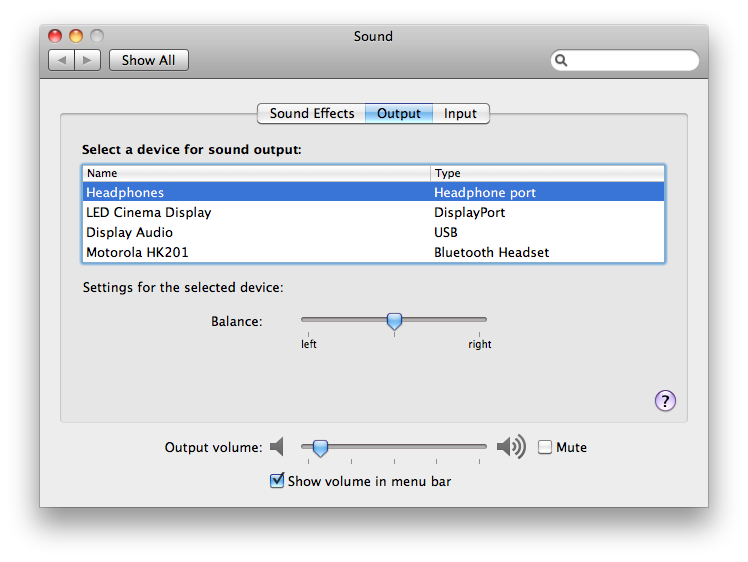
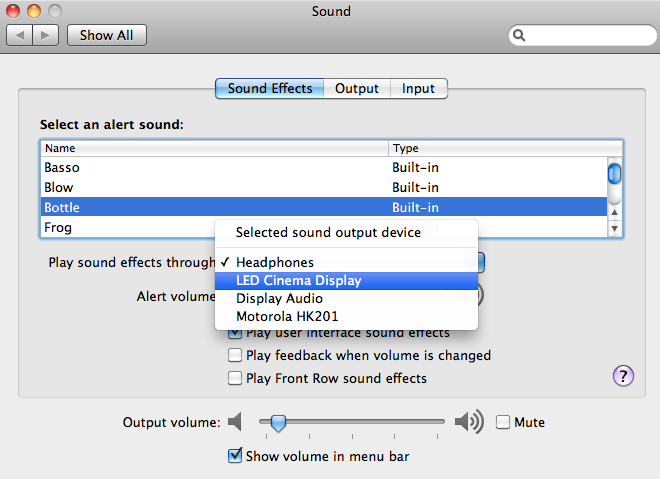
In the System Preferences pane there are two tabbed panes under the “Sound” preference – you can set the speakers to the Cinema Display accordingly:

Cinema Display Speakers and Pianobar

You can also change the sound effects and alert sounds to use the Cinema Display:

Pianobar Cinema Display

Posted in Mac, Tech Tips | Tagged , , , , | Leave a comment